This Butterfinger Cheesecake Recipe Will Make You the Star of Every Dessert Table
Introduction
If you love creamy, decadent cheesecake and the crunchy, peanut-buttery goodness of Butterfinger candy bars, then you’re in for a real treat. This article will take you through everything you need to know to create the perfect Butterfinger cheesecake—from the essential ingredients to pro baking tips and creative topping ideas.
You’ll also learn a bit about the history of Butterfingers, what makes them so crunchy, and whether a Chick-O-Stick is really inside one! Plus, we’ll tackle some common cheesecake-making mistakes and answer burning questions like “What is the secret to making good cheesecake?”
So, whether you’re a seasoned baker or trying your hand at cheesecake for the first time, this guide has you covered. Let’s get started!
Contents
Table of Contents
The Ultimate Butterfinger Cheesecake Experience
What Makes Butterfinger Cheesecake Irresistible?
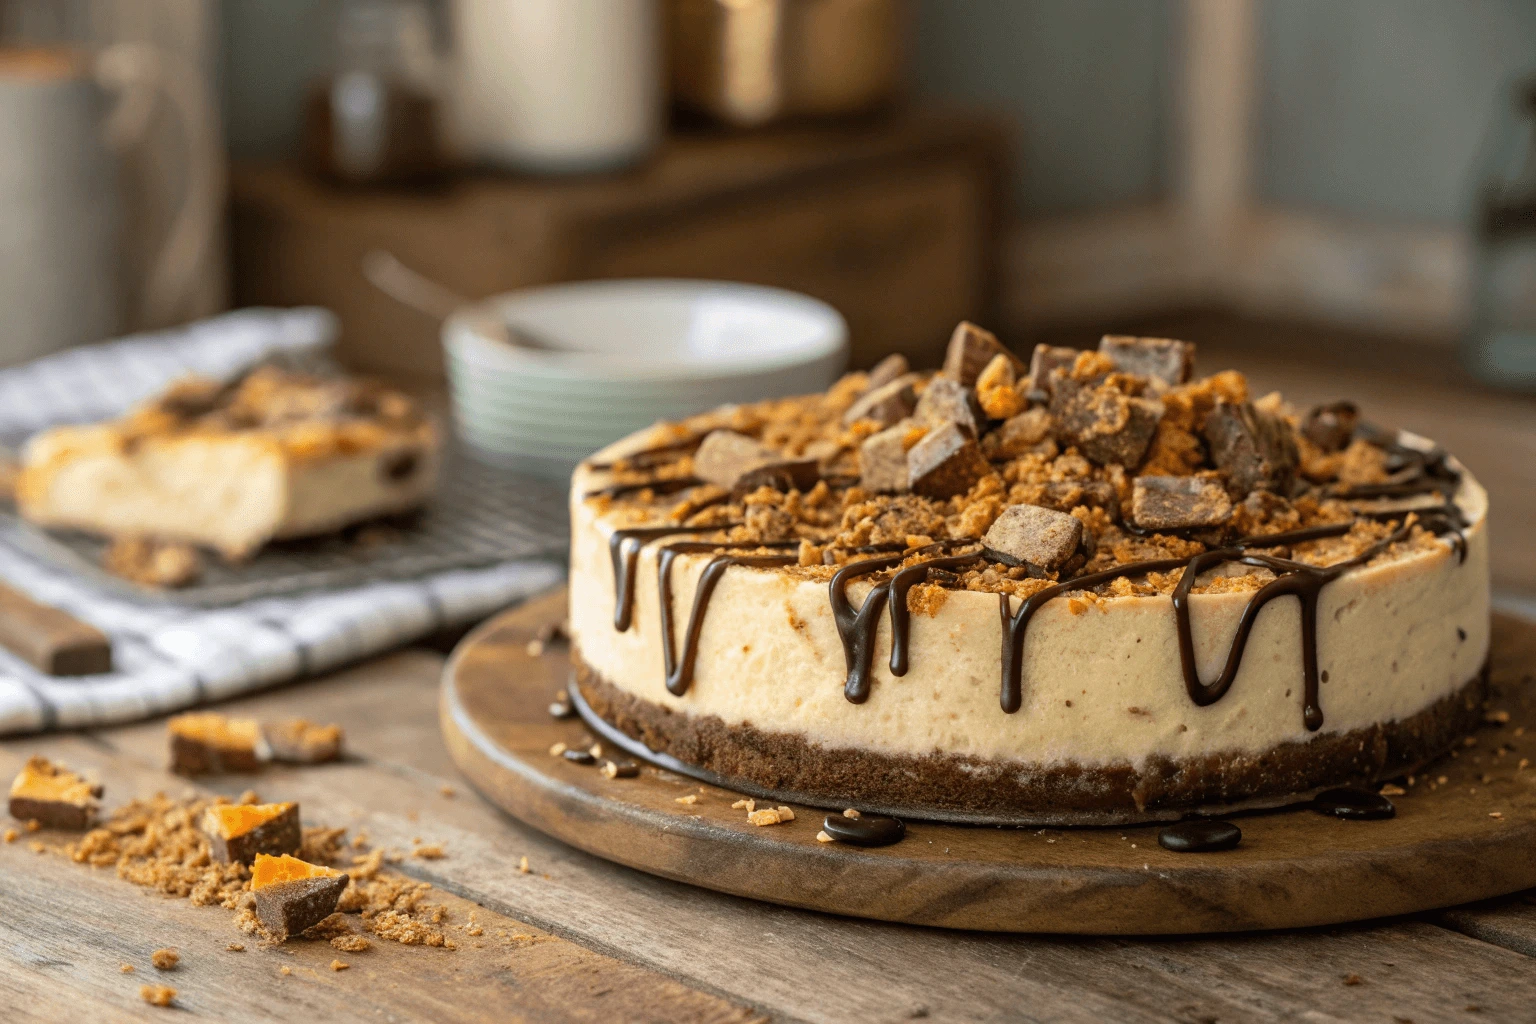
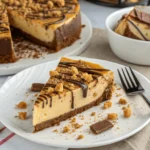
Imagine slicing into a thick, creamy cheesecake, only to discover crunchy bits of Butterfinger candy bars in every bite. The contrast between the silky smooth cheesecake filling and the crispy, peanut-buttery flakes creates an irresistible texture.
One of the best parts? The Oreo cookie crust. It adds a rich, chocolatey base that perfectly complements the peanut butter flavor of the Butterfinger pieces. Top it all off with drizzles of caramel and chocolate, and you’ve got a dessert that’s as beautiful as it is delicious.
But what really makes this cheesecake stand out is its balance of flavors. It’s sweet but not overpowering, rich but not heavy. And let’s be real—who can resist Butterfinger candy in dessert form?
The Perfect Combination of Crunch and Creaminess
What’s the key to getting that perfect crunch in every slice? It all comes down to how you incorporate the Butterfinger pieces. Some go into the filling, melting slightly to create caramelized pockets of peanut buttery goodness. Others are sprinkled on top, keeping their signature crispiness.
Speaking of crispiness, you may have wondered, “What is the crunchy stuff in Butterfingers?” It’s a flaky peanut butter filling that’s layered and aerated, giving the candy its signature texture. The same principle applies to this cheesecake—you get a mix of creamy and crunchy in every bite.
Ready to bring this dreamy dessert to life? Up next, we’ll dive into the history of Butterfinger and cheesecake, so you know exactly what you’re working with before you start baking.
A Rich History of Butterfinger and Cheesecake
How Butterfinger Became a Candy Icon
Before Butterfinger cheesecake became a dessert favorite, the candy itself had already won over fans for nearly a century. Introduced in 1923 by the Curtiss Candy Company, Butterfinger quickly became a household name thanks to its flaky peanut butter layers coated in rich chocolate.
But did you know Butterfinger got a recipe makeover in 2019? Nestlé sold the brand to Ferrero, and the new owners decided to remove artificial flavors and preservatives. Some longtime fans noticed a difference in taste, leading to questions like, “Why was Butterfinger discontinued?” The truth is, it never was—it just got a facelift.
Despite this change, Butterfinger’s signature crunch remains the same, making it the perfect ingredient for desserts like cheesecake.
The Timeless Appeal of Cheesecake
Cheesecake has been around for thousands of years. The ancient Greeks made early versions using simple ingredients like honey and cheese. Over time, the recipe evolved, and by the 1900s, cream cheese became the star ingredient.
With its smooth, rich texture, cheesecake pairs beautifully with crunchy add-ins like Butterfinger pieces. The contrast between creamy and crispy makes this dessert unforgettable, which is why Butterfinger cheesecake has become a favorite among candy lovers and cheesecake fans alike.
Essential Ingredients for a Decadent Butterfinger Cheesecake
Choosing the Best Butterfinger Candy Bars
Not all Butterfinger bars are the same. While you can use the standard-size candy bars, many bakers prefer the fun-size versions because they’re easier to crush. The key to getting that signature crunch in every bite is mixing finely crushed pieces into the batter while reserving larger chunks for the topping.
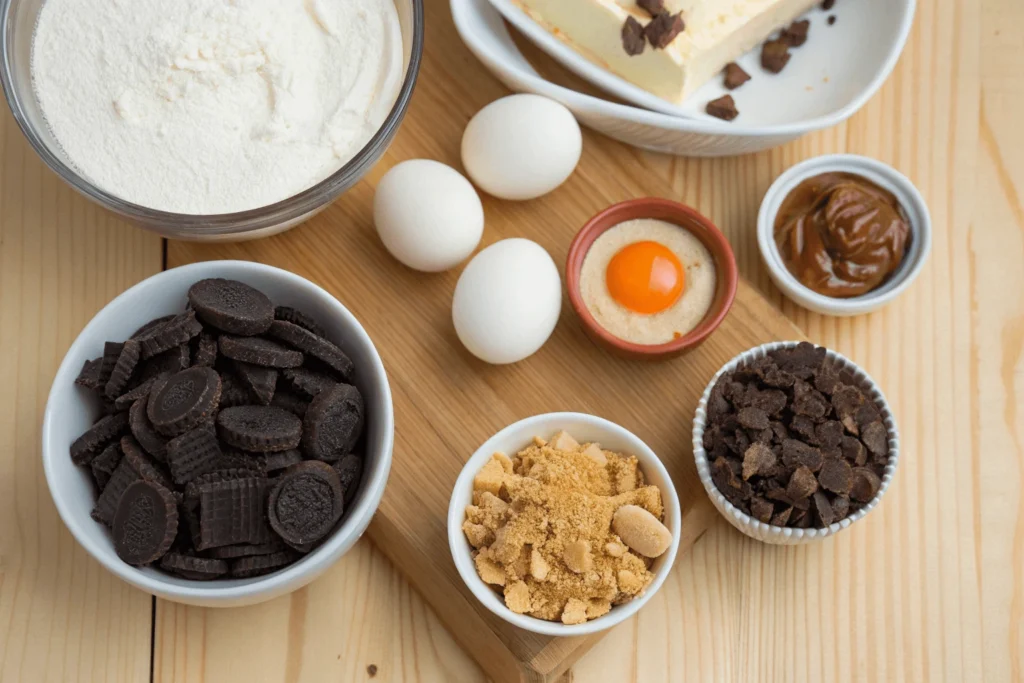
Selecting the Right Cream Cheese for Ultimate Creaminess
The foundation of any cheesecake is cream cheese. To get the smoothest, creamiest texture, always use full-fat cream cheese at room temperature. Low-fat versions can lead to a grainy texture, which isn’t ideal for Butterfinger cheesecake.
Another important factor? Mixing technique. Overmixing the batter can incorporate too much air, which may lead to cracks during baking. Many ask, “What is the secret to making good cheesecake?” The answer is simple—use quality ingredients, mix gently, and bake at a low temperature.
Step-by-Step Guide to Making Butterfinger Cheesecake
Preparing the Chocolate Cookie Crust
The base of a great Butterfinger cheesecake starts with a rich, chocolatey crust. Instead of a traditional graham cracker crust, this recipe calls for Oreo cookie crumbs for extra flavor. Here’s what you need to do:
- Crush about 2 cups of Oreo cookies into fine crumbs. You can use a food processor or crush them manually with a rolling pin.
- Mix the crumbs with 5 tablespoons of melted butter until combined.
- Press the mixture firmly into the bottom of a 9-inch springform pan.
- Bake at 325°F (163°C) for 10 minutes, then let it cool while you prepare the filling.
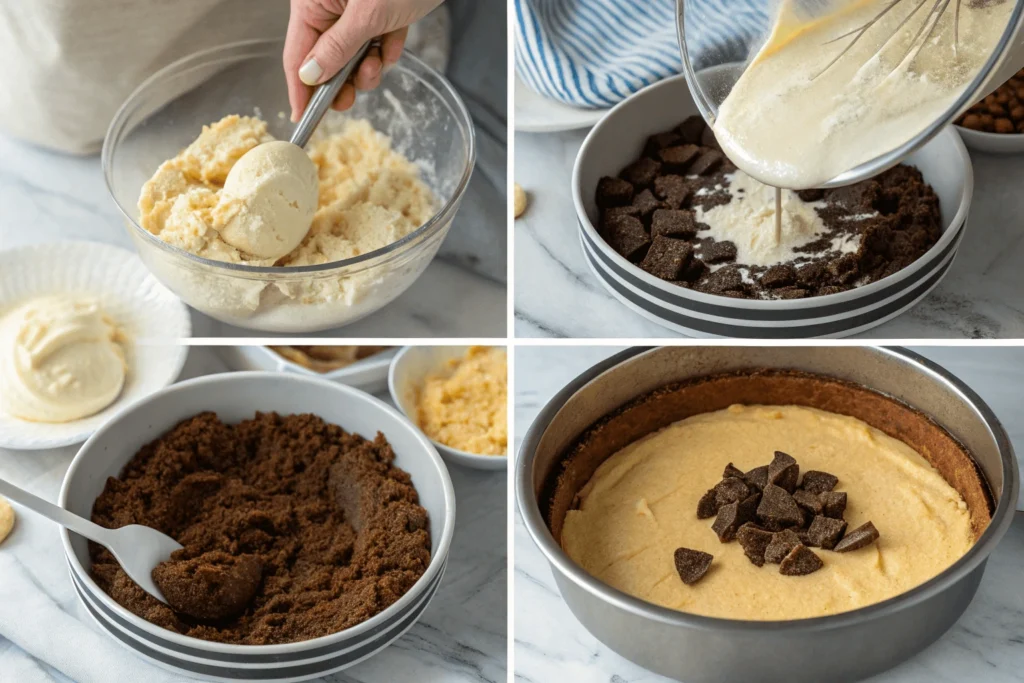
Mixing the Creamy Cheesecake Filling with Butterfinger Pieces
A smooth and creamy filling is what makes this cheesecake truly special. But what’s the trick to avoiding cracks? Many ask, “What is the secret to making good cheesecake?” The answer lies in using room-temperature ingredients and mixing them gently.
Follow these steps for the perfect filling:
- Beat 24 ounces of room-temperature cream cheese with 1 cup of granulated sugar until smooth.
- Add 1/2 cup of peanut butter and mix until fully combined.
- Stir in 3 large eggs, one at a time, mixing just until incorporated.
- Fold in 1 cup of crushed Butterfinger pieces.
Baking and Achieving the Perfect Texture
- Pour the filling over the cooled crust and smooth the top.
- Place a pan of hot water on the bottom rack of your oven to create steam, preventing cracks.
- Bake at 300°F (150°C) for about 60 minutes, or until the edges are set but the center is slightly jiggly.
- Turn off the oven, crack the door slightly, and let the cheesecake cool inside for an hour before transferring it to the fridge.
Let the cheesecake chill for at least 4 hours—overnight is even better! Now, it’s time to add some delicious toppings.
Creative Toppings and Additions to Add More Flavor
Drizzling Caramel and Chocolate for Extra Indulgence
A plain cheesecake is delicious, but a drizzle of caramel and chocolate takes it to the next level. Once your Butterfinger cheesecake has fully chilled, warm up some caramel sauce and drizzle it generously over the top. Follow it with a layer of melted chocolate for extra decadence.
For a stunning look, let the sauces slightly drip down the sides. If you prefer a firmer chocolate topping, allow the melted chocolate to cool slightly before pouring so it thickens on contact.
Adding Crushed Butterfinger for a Crunchy Finish
Ever wondered, “What is the flaky stuff in Butterfingers?” That signature crispiness comes from layers of aerated peanut butter mixed with a sugary coating. To keep that crunch in your cheesecake, sprinkle crushed Butterfinger pieces on top just before serving.
If you add them too early, they may absorb moisture from the cheesecake and lose their crispness. To avoid this, store extra crushed Butterfinger pieces in an airtight container and sprinkle them on fresh slices as needed.
Now that your cheesecake is fully assembled and topped, it’s time to dig in! But before serving, let’s go over some pro tips to make sure every slice turns out perfect.
Pro Tips for the Perfect Cheesecake Every Time
How to Prevent Cracks and Achieve a Smooth Surface
Cracked cheesecake is every baker’s nightmare. Fortunately, avoiding cracks is easier than you might think. One of the most common questions is, “What is the secret to making good cheesecake?” The answer lies in three key factors: temperature, moisture, and patience.
- Use room-temperature ingredients – Cold ingredients don’t mix well, leading to lumps and uneven baking.
- Avoid overmixing – Too much air in the batter causes the cheesecake to rise too quickly and then collapse, creating cracks.
- Bake in a water bath – Placing a pan of hot water in the oven creates steam, keeping the cheesecake from drying out.
If cracks still appear, don’t worry—your Butterfinger cheesecake will still taste amazing. Plus, toppings like caramel and extra Butterfinger pieces can cover any imperfections!
The Importance of Cooling and Chilling Before Serving
Patience is key when it comes to cheesecake. Rushing the cooling process can ruin the texture.
- After baking, turn off the oven and leave the door slightly open for an hour. This helps the cheesecake cool slowly, preventing sudden temperature changes that can cause cracks.
- Then, transfer it to the fridge and let it chill for at least 4 hours, but overnight is best. This allows the flavors to develop and the texture to set properly.
A perfectly chilled Butterfinger cheesecake will slice cleanly and hold its shape beautifully. Now that you know the tricks for a flawless cheesecake, let’s talk about some fun variations!
Variations and Mini Cheesecake Options
Mini Butterfinger Cheesecakes for Individual Servings
Sometimes, a full-sized cheesecake is too much—especially for smaller gatherings. That’s where mini Butterfinger cheesecakes come in! They’re just as creamy and delicious but in a perfect single-serve size.
To make them:
- Line a muffin tin with cupcake liners and press a small amount of Oreo crust into each cup.
- Fill each liner with Butterfinger cheesecake batter, about three-quarters full.
- Bake at 300°F (150°C) for about 18–20 minutes.
- Let them cool completely, then refrigerate for at least 3 hours.
Top each mini cheesecake with crushed Butterfinger pieces and a drizzle of caramel before serving.
Peanut Butter Butterfinger Cheesecake for an Extra Twist
Want an even richer flavor? Add an extra peanut butter kick to your cheesecake.
- Increase the peanut butter in the batter to 3/4 cup for a bolder taste.
- Swirl in melted peanut butter on top before baking for a marbled effect.
- Use a peanut butter cookie crust instead of Oreo cookies for a nuttier base.
This variation is perfect for peanut butter lovers who want a more intense flavor. Now that you have multiple ways to make Butterfinger cheesecake, it’s time to learn the best ways to serve and store it!
Serving and Storing Your Butterfinger Cheesecake
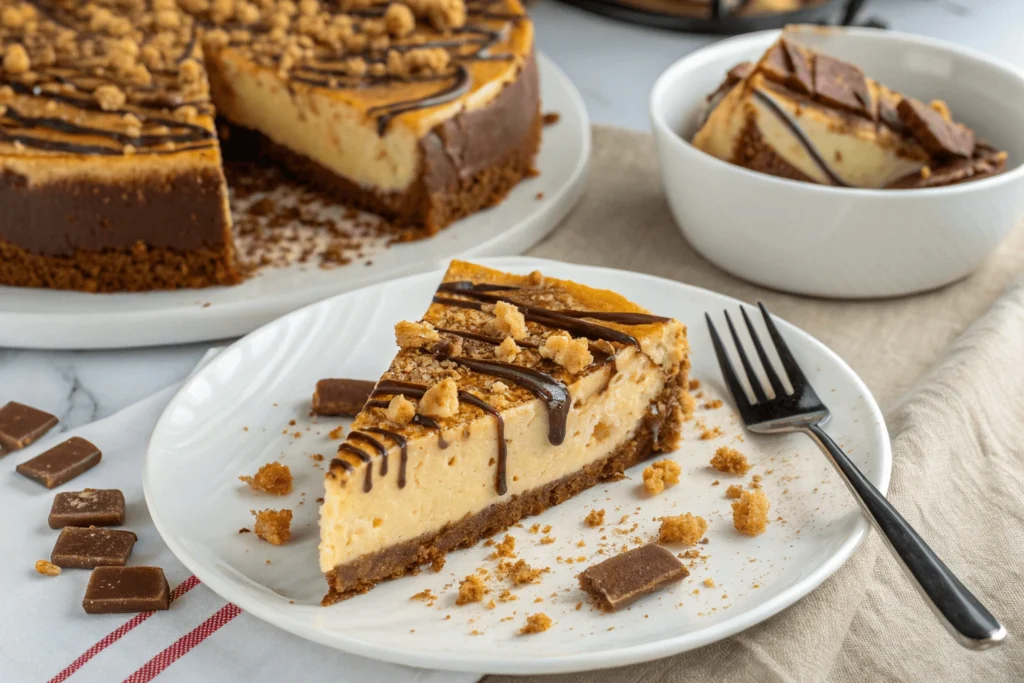
How to Slice Cheesecake Perfectly Every Time
Cutting cheesecake can be tricky, especially when you want clean, restaurant-quality slices. Here’s how to do it right:
- Use a hot knife – Run a sharp knife under hot water, then wipe it dry before slicing. This helps cut through the creamy filling without dragging.
- Wipe the blade after each cut – A clean blade prevents smudges and keeps each slice looking perfect.
- Cut with a gentle sawing motion – Pressing down too hard can crush the crust and make the filling spill over.
A well-chilled Butterfinger cheesecake is much easier to slice, so don’t rush the process. If you want an extra fancy presentation, add a dollop of whipped cream and more crushed Butterfinger pieces to each slice before serving.
Best Ways to Store Leftovers Without Losing Freshness
If you have leftovers (which isn’t likely!), proper storage is key to keeping your cheesecake fresh.
- Refrigerator: Wrap the cheesecake tightly in plastic wrap or store slices in an airtight container. It stays fresh for up to 5 days.
- Freezer: Cheesecake freezes well! Wrap individual slices in plastic wrap, then place them in a freezer-safe container. They’ll last for up to 2 months. When ready to eat, let the slices thaw in the fridge overnight.
Now that you know how to store it, let’s talk about common mistakes to avoid when making Butterfinger cheesecake.
Common Mistakes to Avoid When Making Butterfinger Cheesecake
Overmixing the Batter and Causing Air Bubbles
One of the biggest mistakes people make is overmixing the batter. While it may seem like a good idea to beat the mixture until it’s extra smooth, too much air can create bubbles that expand and crack the cheesecake as it bakes.
Instead, mix just until the ingredients are combined. Scrape down the sides of the bowl to make sure everything is evenly incorporated without overworking the batter.
Baking at the Wrong Temperature and Causing Overcooking
Cheesecake needs gentle, even heat to bake properly. Too high of a temperature can cause it to cook too quickly, resulting in a dry or cracked texture.
- Bake at 300°F (150°C) for a smooth, creamy result.
- Use a water bath or place a pan of hot water in the oven to maintain moisture.
- Check for doneness by gently shaking the pan—if the center jiggles slightly, it’s done.
How to Make an Easy and Irresistible Butterfinger Cheesecake
- Total Time: 5 hours 20 minutes
Description
This rich and creamy Butterfinger cheesecake is a perfect blend of smooth peanut butter filling, crunchy Butterfinger pieces, and a decadent Oreo cookie crust. Topped with caramel and chocolate drizzle, this dessert is a must-try for candy and cheesecake lovers alike!
Ingredients
For the Crust:
- 2 cups Oreo cookie crumbs
- 5 tbsp unsalted butter, melted
For the Filling:
- 24 oz cream cheese, softened
- 1 cup granulated sugar
- ½ cup peanut butter
- 3 large eggs
- 1 tsp vanilla extract
- ¾ cup sour cream
- 1 cup crushed Butterfinger pieces
For the Topping:
- ¼ cup caramel sauce
- ¼ cup melted chocolate
- ½ cup crushed Butterfinger pieces
Instructions
-
Prepare the Crust:
- Preheat oven to 325°F (163°C).
- Mix Oreo crumbs with melted butter until combined.
- Press mixture into a 9-inch springform pan. Bake for 10 minutes, then let cool.
-
Make the Cheesecake Filling:
- Beat cream cheese and sugar until smooth.
- Add peanut butter and mix until well incorporated.
- Mix in eggs one at a time, followed by vanilla extract and sour cream.
- Gently fold in crushed Butterfinger pieces.
-
Bake the Cheesecake:
- Pour filling over the cooled crust and smooth the top.
- Place a pan of hot water on the bottom oven rack to create steam.
- Bake at 300°F (150°C) for 60 minutes, or until the edges are set and the center slightly jiggles.
- Turn off the oven, crack the door open, and let the cheesecake cool inside for 1 hour.
-
Chill & Add Toppings:
- Transfer cheesecake to the fridge and chill for at least 4 hours (overnight is best).
- Drizzle caramel and melted chocolate over the top.
- Sprinkle additional Butterfinger pieces before serving.
Notes
- For clean slices, heat a knife under hot water, dry it, and slice.
- If you want extra crunch, reserve some Butterfinger pieces and add them just before serving.
- Cheesecake stores well for 5 days in the fridge or up to 2 months in the freezer.
- Prep Time: 20 minutes
- Cook Time: 60 minutes
- Category: Dessert
- Method: American
1 thought on “How to Make an Easy and Irresistible Butterfinger Cheesecake”
Comments are closed.